


Table of Contents
- Plan Your Family Photo Gallery Wall Layout Before You Hang Anything
- Gallery Wall Spacing Guide: Measuring and Marking Your Wall
- How High to Hang Pictures for Visual Balance
- Mix Frame Sizes and Styles for a Cohesive Look
- Secure Mounting and Child Safety Considerations
- Lighting, Glare, and Photo Preservation Tips
- Frequently Asked Questions
Last Updated: October 20, 2026
Plan Your Family Photo Gallery Wall Layout Before You Hang Anything
The biggest mistake people make is grabbing a hammer and nails without a plan. They end up with crooked frames, uneven spacing, and a wall that looks cluttered instead of curated.
Before you hang anything, work through four decisions in order: pick a focal point, size the arrangement to the wall, choose a layout style, and test it with templates. Skipping any one of these is how walls end up with orphan frames and awkward gaps.
Step 1: Pick the Focal Point
Every gallery wall needs one anchor. That is usually the largest frame, the most meaningful portrait, or the piece you want people to see first. Place the focal point slightly off-center rather than dead center, a common pattern is to set it about one-third of the way in from one edge of the arrangement, which reads as intentional rather than static.
The focal point also determines your layout style. A single large anchor surrounded by smaller frames suits an organic arrangement. A grid of equal-size frames works when no single photo dominates.
Step 2: Size the Arrangement to the Wall and Furniture
A gallery wall that is too small for its wall looks lost; one that is too large feels heavy. Two rules of thumb keep the proportions right:
- Width relative to furniture: When hanging above a sofa, console, or bed, aim for the arrangement to span roughly two-thirds to three-quarters of the furniture's width. A 72-inch sofa pairs well with a gallery about 48 to 54 inches wide.
- Width relative to the wall: Leave at least 6 to 12 inches of breathing room between the outer frames and the nearest wall edge, corner, or doorway trim. On a narrow wall, that may mean a single vertical column rather than a wide grid.
Measure the wall's usable width and height with a tape measure and write the numbers down. Then sketch your arrangement on graph paper at scale, one square per inch works well, so you can see whether it fits before you commit.
Step 3: Choose Your Layout Style
Your layout style sets the entire tone. The three main approaches are symmetrical grids, organic arrangements, and mixed layouts.
Symmetrical grids arrange frames in straight rows and columns with even spacing. This creates a clean, formal look that works in any room.
Organic or eclectic layouts vary frame size and spacing for a relaxed, personal feel.
Mixed layouts combine both.
Think about your room's personality. A formal dining room might call for symmetry. A family room can handle more creativity.
Step 4: Test the Layout with Paper Templates
This is the step most people skip, and it is the one that saves the most regret. Cut paper or cardboard templates to the exact size of each frame, including the frame's outer dimensions, not the photo size. Tape them to the wall in your chosen arrangement.
Step back across the room and look. Then look again from the doorway, from the sofa, and from the spot where people will actually stand. Templates let you move a frame two inches without patching a hole.
Gather and Edit Your Photos
Start by collecting more photos than you have wall space, you need options to be selective. Pull them from your phone, computer, and old albums.
Edit before printing. Crop to remove distractions, adjust brightness and contrast, and consider black-and-white or monochrome treatments for visual unity across mixed subjects and eras.
Lay the printed photos on the floor or a large table and arrange them in your chosen layout. Move them around until the composition feels right. This dry run catches color clashes and duplicate poses before anything goes on the wall.
Gallery Wall Spacing Guide: Measuring and Marking Your Wall
Spacing is everything. Too close together and frames feel cramped. Too far apart and they look disconnected. The goal is visual balance, and balance comes from consistent measurements rather than eyeballing.
Calculate Spacing Between Frames
For a symmetrical grid, measure from the center of one frame to the center of the next. Most designers use 2 to 3 inches between frames as a starting point, enough breathing room without making the wall feel sparse.
For organic layouts, spacing is more intuitive but still needs a rule. A common pattern is to keep gaps between 2 and 4 inches and to avoid any gap that is noticeably larger than the rest.
Create a Paper Template and Mark the Wall
Cut paper templates to each frame's outer dimensions. Tape them to the wall, then measure and mark the center of each template with a pencil. This center mark is your reference point for the next step.
Use a level to confirm each template is straight before you mark anything. A 24-inch level is enough for most frames; a laser level speeds up a full wall but is not required.
Find the Hanging Point on Each Frame
Every frame has a specific distance between its top edge and its hanging hardware, a sawtooth hanger, D-rings, or a wire. Measure that distance on the back of each frame and write it down.
For wire-hung frames, pull the wire taut toward the top of the frame and measure to the peak of the wire, since the wire will stretch slightly under the frame's weight. Hang the frame, then check it with a level and adjust the wire or hardware if it tilts.
Choose the Right Hardware for the Weight
Hardware choice depends on frame weight and wall type:
- Light frames (under about 10 pounds): A single nail or a small picture hook is usually sufficient in drywall.
- Medium frames (roughly 10 to 25 pounds): Use a self-drilling drywall anchor or a toggle-style anchor rated for the weight, or drive into a stud where one is available.
- Heavy frames and mirrors (over about 25 pounds): Anchor into wall studs whenever possible, or use heavy-duty toggle bolts rated well above the frame's weight. When in doubt, size up the hardware.
Use a stud finder to locate studs before hanging heavy pieces. Mark stud edges with painter's tape so you do not lose them under the templates.
Room-Specific Spacing Adjustments
- Above a sofa or console: Keep the bottom edge of the lowest frame about 6 to 10 inches above the furniture back so the arrangement relates to the furniture rather than floating.
- Staircases: Step the arrangement diagonally, keeping the bottom edges roughly parallel to the stair slope and maintaining consistent gaps along the diagonal.
- Narrow hallways: Use a single vertical column or a tight two-wide grid; wide arrangements feel cramped in corridors under about 36 inches wide.
- Small rooms: Fewer, larger frames read better than many small ones, which add visual clutter in tight spaces.
Renter-Friendly Alternatives
If you cannot put holes in the wall, adhesive picture strips and removable hooks rated for the frame's weight are the standard solution. Clean the wall with rubbing alcohol and let it dry fully before applying, press firmly for the recommended time, and avoid hanging anything above the weight rating. For heavier pieces, a leaning shelf or a photo ledge distributes weight without wall damage.
Mark, Photograph, and Hang
Mark each nail hole with a pencil and double-check measurements before you hammer. Take a photo of the marked wall so you have a backup reference if pencil marks rub off. Hang the focal point first, level it, then work outward. Check each frame with a level as you go, one crooked frame throws off the whole wall.
How High to Hang Pictures for Visual Balance
The eye level rule is your guide: hang the center of your display family photos at 57 to 60 inches from the floor.
However, this changes based on context.
For a gallery wall with mixed frame sizes, calculate the center point of the entire arrangement. Hang that center point at eye level.
Use a level on each frame as you hang it. Even one crooked frame throws off the whole wall. Take your time here.
Mix Frame Sizes and Styles for a Cohesive Look
Mixing frame sizes creates visual interest. But you need a strategy so it doesn't look chaotic.
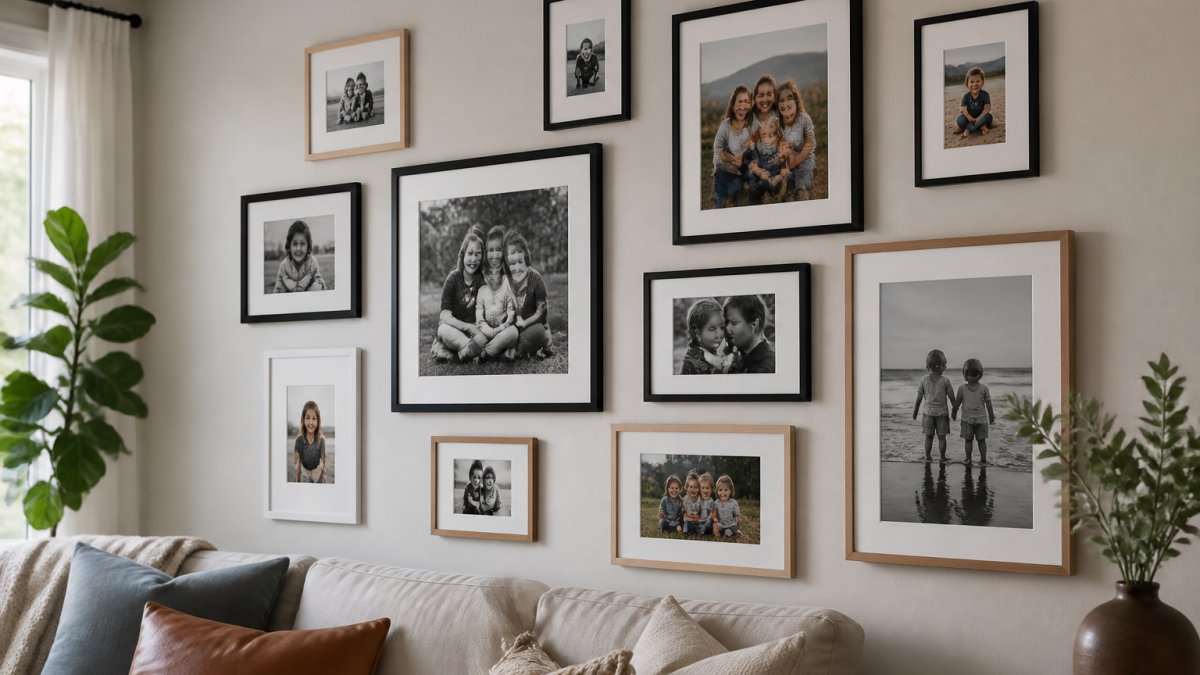
Start with a consistent element: matching frames in one color, or matching mats.
Use matching frames as anchors. Larger matching frames can frame your most important family moments. Smaller matching frames fill gaps.
Consider mats and borders. White mats work with almost any frame and photo. They add breathing room around your image.
Black-and-white photos work beautifully with color photos when the frames are consistent.
Mix frame orientations too. Landscape and portrait frames together create dynamic composition.
Secure Mounting and Child Safety Considerations
Heavy frames need secure mounting. Use wall anchors rated for the weight of your frames plus photos. Don't guess on weight capacity.
If you have young children, secure frames properly so they can't pull them down. Use museum-quality hanging hardware designed not to fail.
Avoid placing frames where children can reach them easily. Higher placement protects both kids and your photos. Sharp frame corners are a hazard at child height.
Check your frames periodically. Make sure nothing is loosening. Vibrations from doors slamming or footsteps can shift things over time.
Lighting, Glare, and Photo Preservation Tips
Lighting changes everything. Natural light is beautiful but can fade photos over time. Direct sunlight fades color quickly.
Position your family photo wall away from direct sun when possible.
Avoid placing photos directly above heat sources like radiators or vents. Temperature swings damage photos and can warp frames.
Glare makes photos hard to see. Matte finishes reduce glare compared to glossy finishes.
Rotate photos seasonally if they're in direct light. This distributes fading evenly. Your family moments deserve protection.
Keep humidity steady. Extreme swings between dry and humid air damage photos and frames.
Frequently Asked Questions
How do you arrange family photos on a wall to make them look intentional rather than random?
Start by selecting your layout style (grid, symmetrical, or organic) and laying out all frames on the floor first. Group photos by theme or time period, mix frame sizes and orientations, and maintain consistent spacing between frames. Use matching mats or a unified color palette to create visual cohesion. This planning step prevents mistakes and ensures your display family photos arrangement feels curated, not cluttered.
What is the ideal spacing between frames on a gallery wall?
Aim for 2 to 3 inches between frames for a balanced gallery wall spacing guide. Measure the distance from the outer edge of one frame to the outer edge of the next. Consistent spacing creates rhythm and makes the arrangement feel intentional. For tighter, more modern looks, use 1.5 inches; for a relaxed, eclectic feel, increase spacing to 4 inches. Use painter's tape and a level to mark positions before hanging.
How high should family photos be hung on a wall?
Hang photos so the center of the arrangement is at 57 to 60 inches from the floor, which is at average eye level when standing. For photos above furniture, position the bottom edge 8 to 12 inches above the furniture surface. This how high to hang pictures guideline ensures your display family photos are at a comfortable viewing height and creates visual balance in the room. Adjust slightly if your ceilings are unusually high or low.
Can you mix different frame styles and colors on a family photo wall?
Yes, mixing frame sizes and orientations adds visual interest and makes the display feel curated. To keep it cohesive, choose a unifying element: matching mats in white or cream, a consistent color palette in the photos themselves (black-and-white or monochrome tones), or frames in related finishes (all wood tones or all metals). Limiting your color palette to 2 to 3 dominant tones prevents the wall from looking chaotic while still allowing creative variation.
Creating a beautiful family photo wall takes planning, but the result is worth it. You're building a visual story of the people you love most. The Basket Filler believes every family deserves a home filled with meaningful, personalized touches that celebrate those connections. Start with a solid plan, measure carefully, and take your time with placement. Your wall will reflect the care you put into it, turning everyday moments into a gallery that brings joy every time you walk past it.


